Game Design - Color Match Game 2
In the previous blog post, I showcased the result of my first pass at making a minigame. With the goal of just getting something to work, I finished with the game giving you a color, and the player trying to stand on the correct platform. But was that a game? Was it even fun? With no stakes, no skill expression, a lot needed to be fleshed out so that the player would feel rewarded for their improvement. After toiling away in the depths of vectors, HLSL, and UI widgets, the current state of the game is starting to gain replay value in its design.
New UE5 concepts
LERP (Linear Interpolation) - I am most familiar with this concept from animation. My initial idea for moving platforms around was to LERP them between two generated transform values. While it was not my final solution, this will be useful for smooth transitions of animation or shaders in the future.
UI Widget - This is another blueprint type to handle UI overlays. Each individual piece, like text or a button, can be converted to a variable to effect their parameters with custom functions. If you’re familiar with CSS, MEL, or Qt for UI, a lot of the terminology and workflow is similar, just more interactive.
Custom Node (HLSL) - This can really open up your Material Blueprint workflow, allowing you do write HLSL code, comparable to the relationship of C++ to a regular blueprint. The parameters that control the HLSL code can be variables manipulated in other blueprints, though no output variables are possible due to GPU vs. CPU data handling.
Render Targets - Takes a 2D snapshot of a 3D space and lets you analyze or display the result. This can live in your content drawer, though I see the most interesting uses when it’s utilized at runtime, for snow trails, CCTV cameras, and in my case, counting pixel colors.
TMap, TPair - Unreal’s version of a dictionary, essentially a 2xN array. The TMap is the entire array, and the TPair is an individual index.
Casting in Blueprints - Creates a hard reference to another class. Can quickly be a performance issue if your character has a hard reference to every interactable item, for example. If a variable exists on the C++ side, you can access the variable through a cast, so I find it helpful for getting game rule references from the GameModeBase. In general, if the interaction relationship is predictably 1 to 1, casting is a good option.
Platform Movement
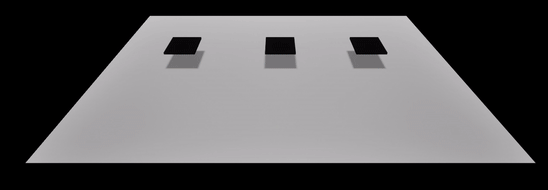
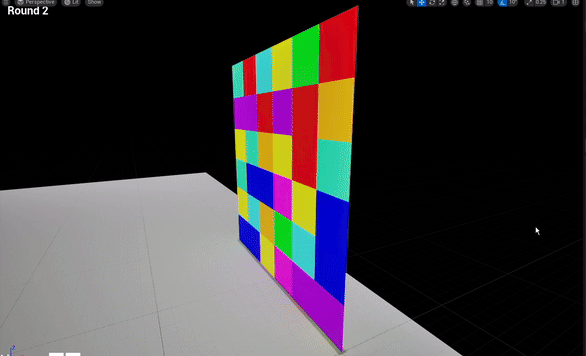
The main theme of this update was to add progressive difficulty in three ways. The first is to add platforming difficulty and confusion in the quantity of options when selecting the correct color. The initial idea was to run a movement function for the platform, which would roll a random position vector that the platform would LERP to over time. When it reached the destination, it would roll a new location. The issue was this was that velocity became inconsistent depending on how far away the new location was. This was also not scalable, because the random position vector was based on a coordinate location in world space. Instead I rolled a random direction, and incremented it that way. It will continue in a direction until it hits another collision box that causes it to change its direction vector. For Z movement, it is just -1 or 1, so that the platform would change in height as it moved in XY. The other issue is collision. I initially tried to use begin overlap and end overlap to detect when the platform touched anything. This is not ideal in this case because that is an event tick call, and I wanted the direction to change the and move in the opposite way. Because of the frequency of those event procs, the platform would get stuck in a loop. Instead after every increment in a direction, if a collision is detected, it will move in that direction enough to not be detected immediately on the next tick. This is the process for walls, other platforms and the player so that the player cannot get stuck underneath. If the player’s head hits the platform, the platform will switch its Z to +1. In this way, all platforms occupy their own rectangular prism of space at the end of the round, so there’s no confusion what counts as “on the right platform.” As the rounds go on, a new platform will be added to the board for further complexity, until there are 12 (matching the max number of unique colors).
Screen material implimentation
The other two difficulty ideas have to do with the screen choosing the color. First the color pool gradually increases, from 3 up to 12. Second, the grid increases in the amount of squares on each side, from 1x1 to 8x8.
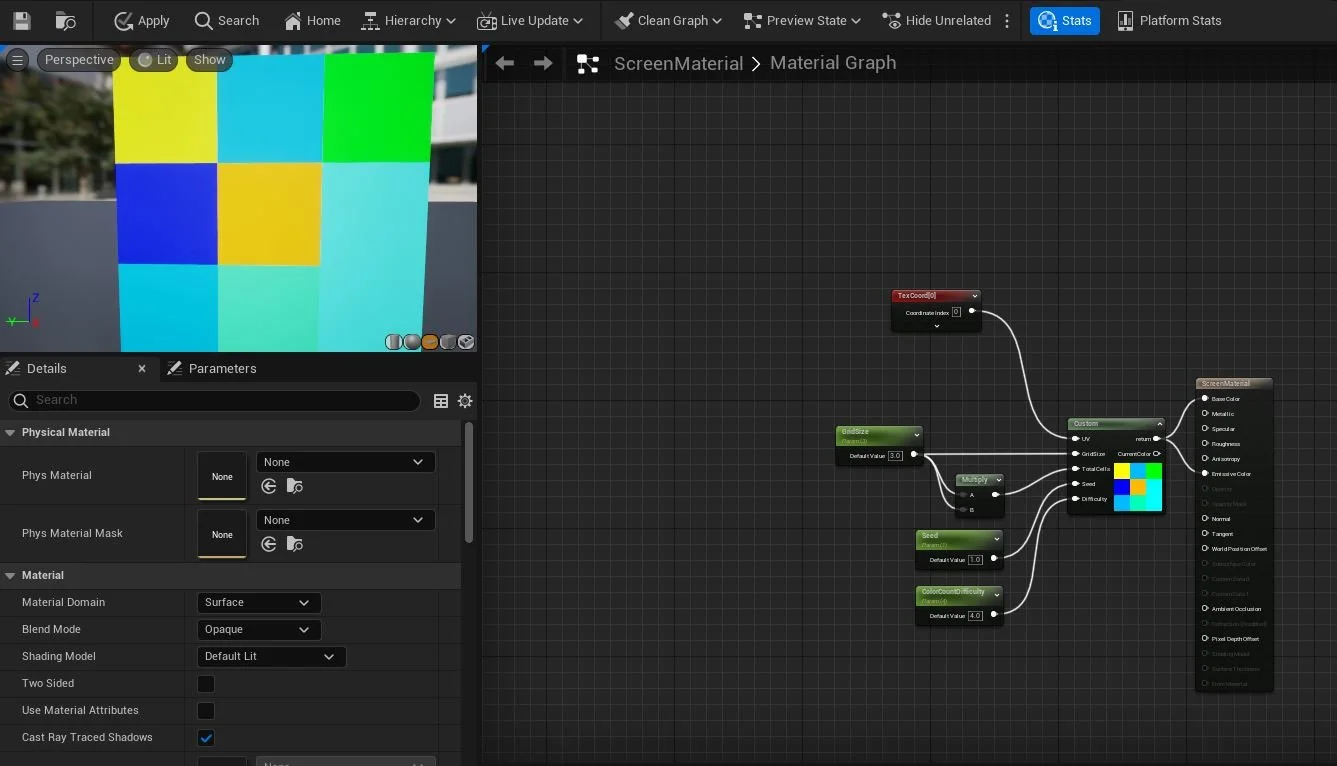
In the previous setup, the material on the screen had an exposed parameter for the base color that was randomly assigned from a list of linear color vectors in the MainScreen blueprint. If I were to scale this setup to grids that have more squares, you would effectively need this parameter for each of the UV ranges as the square is divided further. In a grid like an 8x8, this is 64 queries of an array in the MainScreen blueprint per Timed Event tick. It is much more efficient to do UV grid iteration with a Custom Node, HLSL code, in the Material Graph. These basically serve the same purpose as a function in a blueprint class; taking parameters, working behind the scenes, and giving an output, in this case the full base color and emissive color.
The color assignment had to be done from the HLSL node because every time the parameters are changed, the entire screen would be rerun. This unnecessarily would run the random color generator 64 times in ONE tick, which is even more crippling to performance.
Arrays cannot be passed as parameters to the HLSL custom node, which is okay, because I do not intend to give customization of the color list to the player, so this can be written into the node itself. The array is ordered in a way so that as a ColorDifficulty variable is increased with rounds, the custom node will be selecting from a greater amount of indices in the array of colors.
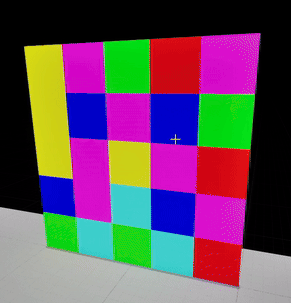
The next issue was figuring out how to actually read these colors and find the majority. For analyzing textures in real-time, Render Targets are great, and widely applicable. I’ve seen them used at runtime for screenshots, snow movement tracking, CCTV cameras, and anything else that wants to turn the 3D information into a 2D asset. By taking a render target and making it the size of the grid of squares times 10, 50x50 for instance, I can read the color at each pixel location and still get accurate results despite the small size. The render targets at this size never exceed ~50kb, so it is not hurting performance very much in this case.
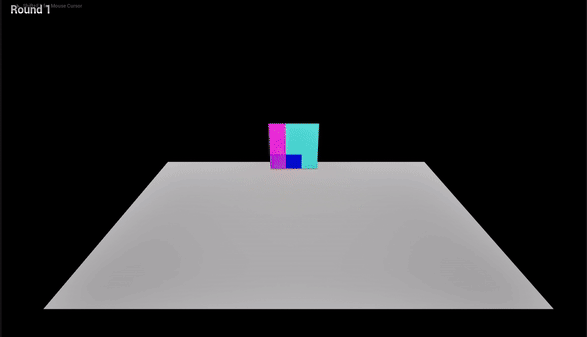
Say the grid is 5x5. The pixel x=5, y=5, will be read to get the color at the center at the first square. That is added to a TMap, keeping track of the Linear Color Vector, and how many times it has appeared. This continues until it has read the entire range of the render target. Once the loop is finished, the majority color is set to the “correct” color, and the platforms are given color options.
…But what if there’s a tie?
This is the part of this build that took the longest, despite having a pretty simple solution. This is a very unique case where we would really love for the HLSL and material shader itself to output a list of all of the colors it chose to populate the grid. That way, if the shader had assigned a tie, we could catch it and assign a different color before the shader is finished. Unfortunately, the roles of the CPU and GPU get in the way here, where data like variables or lists simply cannot be returned from the Custom HLSL Node. That leaves us with the task of solving this AFTER we have analyzed the color grid with the render target.
This is when I figured, if I can’t actually make the grid texture change, I can at least make it look like there’s no tie to the players. My idea was to take a plane that would be scaled to the size of a current grid square, and have it spawned when a tie was detected by the render target.
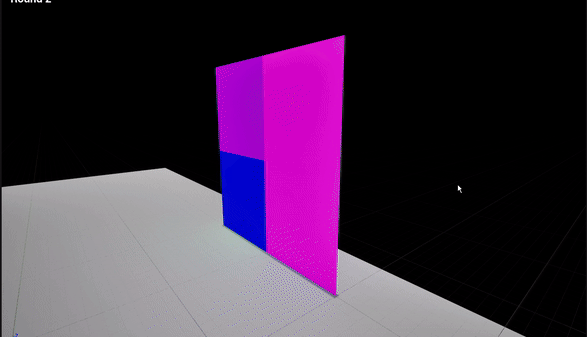
Examples of the color patch in action. Transformed in -X greatly for these examples, normally undetectable by the player
Let’s say we have a 2x2 grid with 4 colors, Red, Blue, Yellow, Green. Our TMap will have four TPairs, Red:1, Blue:1, etc. When there are two TPairs with the same highest value, the ColorPatch actor is spawned, and assigned randomly one of the majority colors. The grid will then be read again by a renderTarget until it runs into the first square colored one of the other majority colors. The color patch is transformed seamlessly to cover up that color (Hyperbolic and Harmonic progression)! Since we know that the color patch has the correct color, we can just override the variable that assigns colors to platforms in order to have the correct color be visually the majority color, despite the shader having a tie in actuality.
Barebones UI
A final more so visual touch for this build was to take all of the Print Strings I was using for player feedback and convert them to UI placeholders. I also wanted the UI to serve as a start, pause, and game over system. Now the player’s remaining lives and correctness is displayed at the appropriate times in a more appealing way.
Interesting to note with the pause system, I quickly noticed a potential cheating issue with being able to count the colors outside of the timer. So now when you pause, the grid is swapped out for a black texture, AND a pause limit, 3, was added to avoid pause buffering as well. In a game where high scores are involved, players will find away to game the system!
Final Thoughts
I plan to do one final update to design and mechanics before putting this project on ice and trickling out art assets. I am much more interested in a functional, fun and original game that stands on its own without fancy rigs, animations, lighting, etc. Of course there are plans for that, but it is a lower priority than creating the next game.
I will be working on multiplayer functionality, including local, online, and computer opponents. I want to expose some of the internal game rule variables to the player, so that they can set custom durations, player count, among other things. I will be putting in a full greybox, with stand in player characters, as well as sound effects. The goal is to have everything but the art done, though the slots for the art to fit in will be built out.