Game Design - Color Match Game 1
In the previous blogpost, I put together a sort of fundamental rule set that I would like to drive the minigames that will be a part of this collection. I believe them to be malleable enough to transcend genre and ruleset for any type of short form competitive multiplayer game. The first game, Color Match, is a spin on the Mushroom Mix-Up minigame I dissected in the last post. I hope to take the core concept and drive up the complexity to put my core tenants to the test.
I’m approaching these games in 4 phases. The first phase, accomplished here, is to distill the basic game loop and get it working in an engine playtest. Next, the goal is to get every extra gameplay feature that heightens the complexity, like power-ups, ramping difficulty, etc. Then, working on getting 1-3 AI opponents into the game to bring the multiplayer to life. The final wrap up will be integration of final art assets, though things like characters will be shared between games so this step will be built up throughout the whole project.
Another thing, this project is not about learning an engine, or a software, or a tool. I intend to think of the design and programming concepts with everything I learn in UE5, and how that can be interpreted independently of the engine itself.
That being said, I will be giving my findings on different techniques I come across to execute a level sized game in Unreal Engine 5. I’ll put a sort of table of contents below, feel free to CTRL+F your way around.
Unreal Engine 5 Notes and Concepts
Color Match First Execution
Post-Analysis and Next Steps
Let’s dive in!
Unreal Engine 5 Notes and Concepts
Here are the essential blueprints that I will either be extending with C++ or just implementing as they exist:
Level Blueprint: Each individual game will need one of these, it is the container that gives the playground to add your assets, as well as assign core classes per minigame.
Game Mode Blueprint (C++) - This will control the flow of a “round” of gameplay of a game. In the Mushroom Mix-up example, a color being chosen, lowering the wrong mushrooms, and eliminating the fallen players would be a loop that continues as long as more than one player is still alive.
Character Blueprint (C++) - This is a template for having a player controlled character that can be assigned a Skeletal Mesh (rig and model, essentially). By extending it with C++, various functions and variables can be declared, such as number of lives, destroy actor, check if color selection is correct, etc. This class can further be extended into both a player controlled HumanCharacter, and an AIEnemyCharacter.
PlayerController Blueprint - This acts as another layer of encapsulation for your character control. For situations where input shouldn’t be handled on the character itself, such as in a multiplayer game, Enhanced Input assignments can exist here.
GameInstance Blueprint - This is a global control of the game. Since my game is made up of a dozen or so smaller games, things like high scores, number of wins, etc. could be placed in this class to save information between levels.
GameState Blueprint - Lower priority, but GameState can expose some information like scoreboards behind the security of the server. If I were to add an online functionality for this, GameState could handle these issues.
Actor Blueprints (C++) - Anything else, like the color chooser or the platforms, can be actors that have functions and events accessible to the Game Mode blueprint.
Here is some C++ terminology explained in the context of UE5 development:
Public vs. Protected vs. Private - When making functions or variables in a class .h file, choose the group header based on how much access you want the data to have. Public allows any class to access it, Protected is just the class and its children, Private will be just the class itself.
UFUNCTION - A function specifier that should be put above a declared function for it to be accessible in a certain way in blueprints. Some of the parameters I have found use for include:
BlueprintImplementableEvent - When you want the function to be an event (the red blueprint node) use these and give no definition in the .cpp file
BlueprintCallable - If the function is defined in the .cpp file, use this
Category = “ “ - Sorts the function for easy searchability in blueprints
UPROPERTY - Essentially the same idea as a UFUNCTION, but used for variables. Some parameters:
BlueprintReadWrite - Full access to blueprints. If you want variable control in the C++ class and the blueprint
BlueprintReadOnly - Can only be queried in blueprints, assignment and modification done on C++ side
Some other loose concepts I’ll put here as well. There are some extra data types and helpful functions not standard with regular C++.
FVector - A dat aype for creating vectors. Useful in this game for assigning RGB colors
TArray<arraytype> - A data type for creating an array of anything type you want
FString - A data type for strings (like Python). Gets around char manipulation
UE_LOG(LogTemp, Warning, TEXT("Hello World")) - A handy function for printing troubleshoot statements in the viewport when running a C++ function.
Color Match First Execution
Here I will give a breakdown of my process getting this project off the ground to a first draft. For any issues I ran into, whether it be an engine quirk or my own knowledge gap, I will highlight it here with my solution.
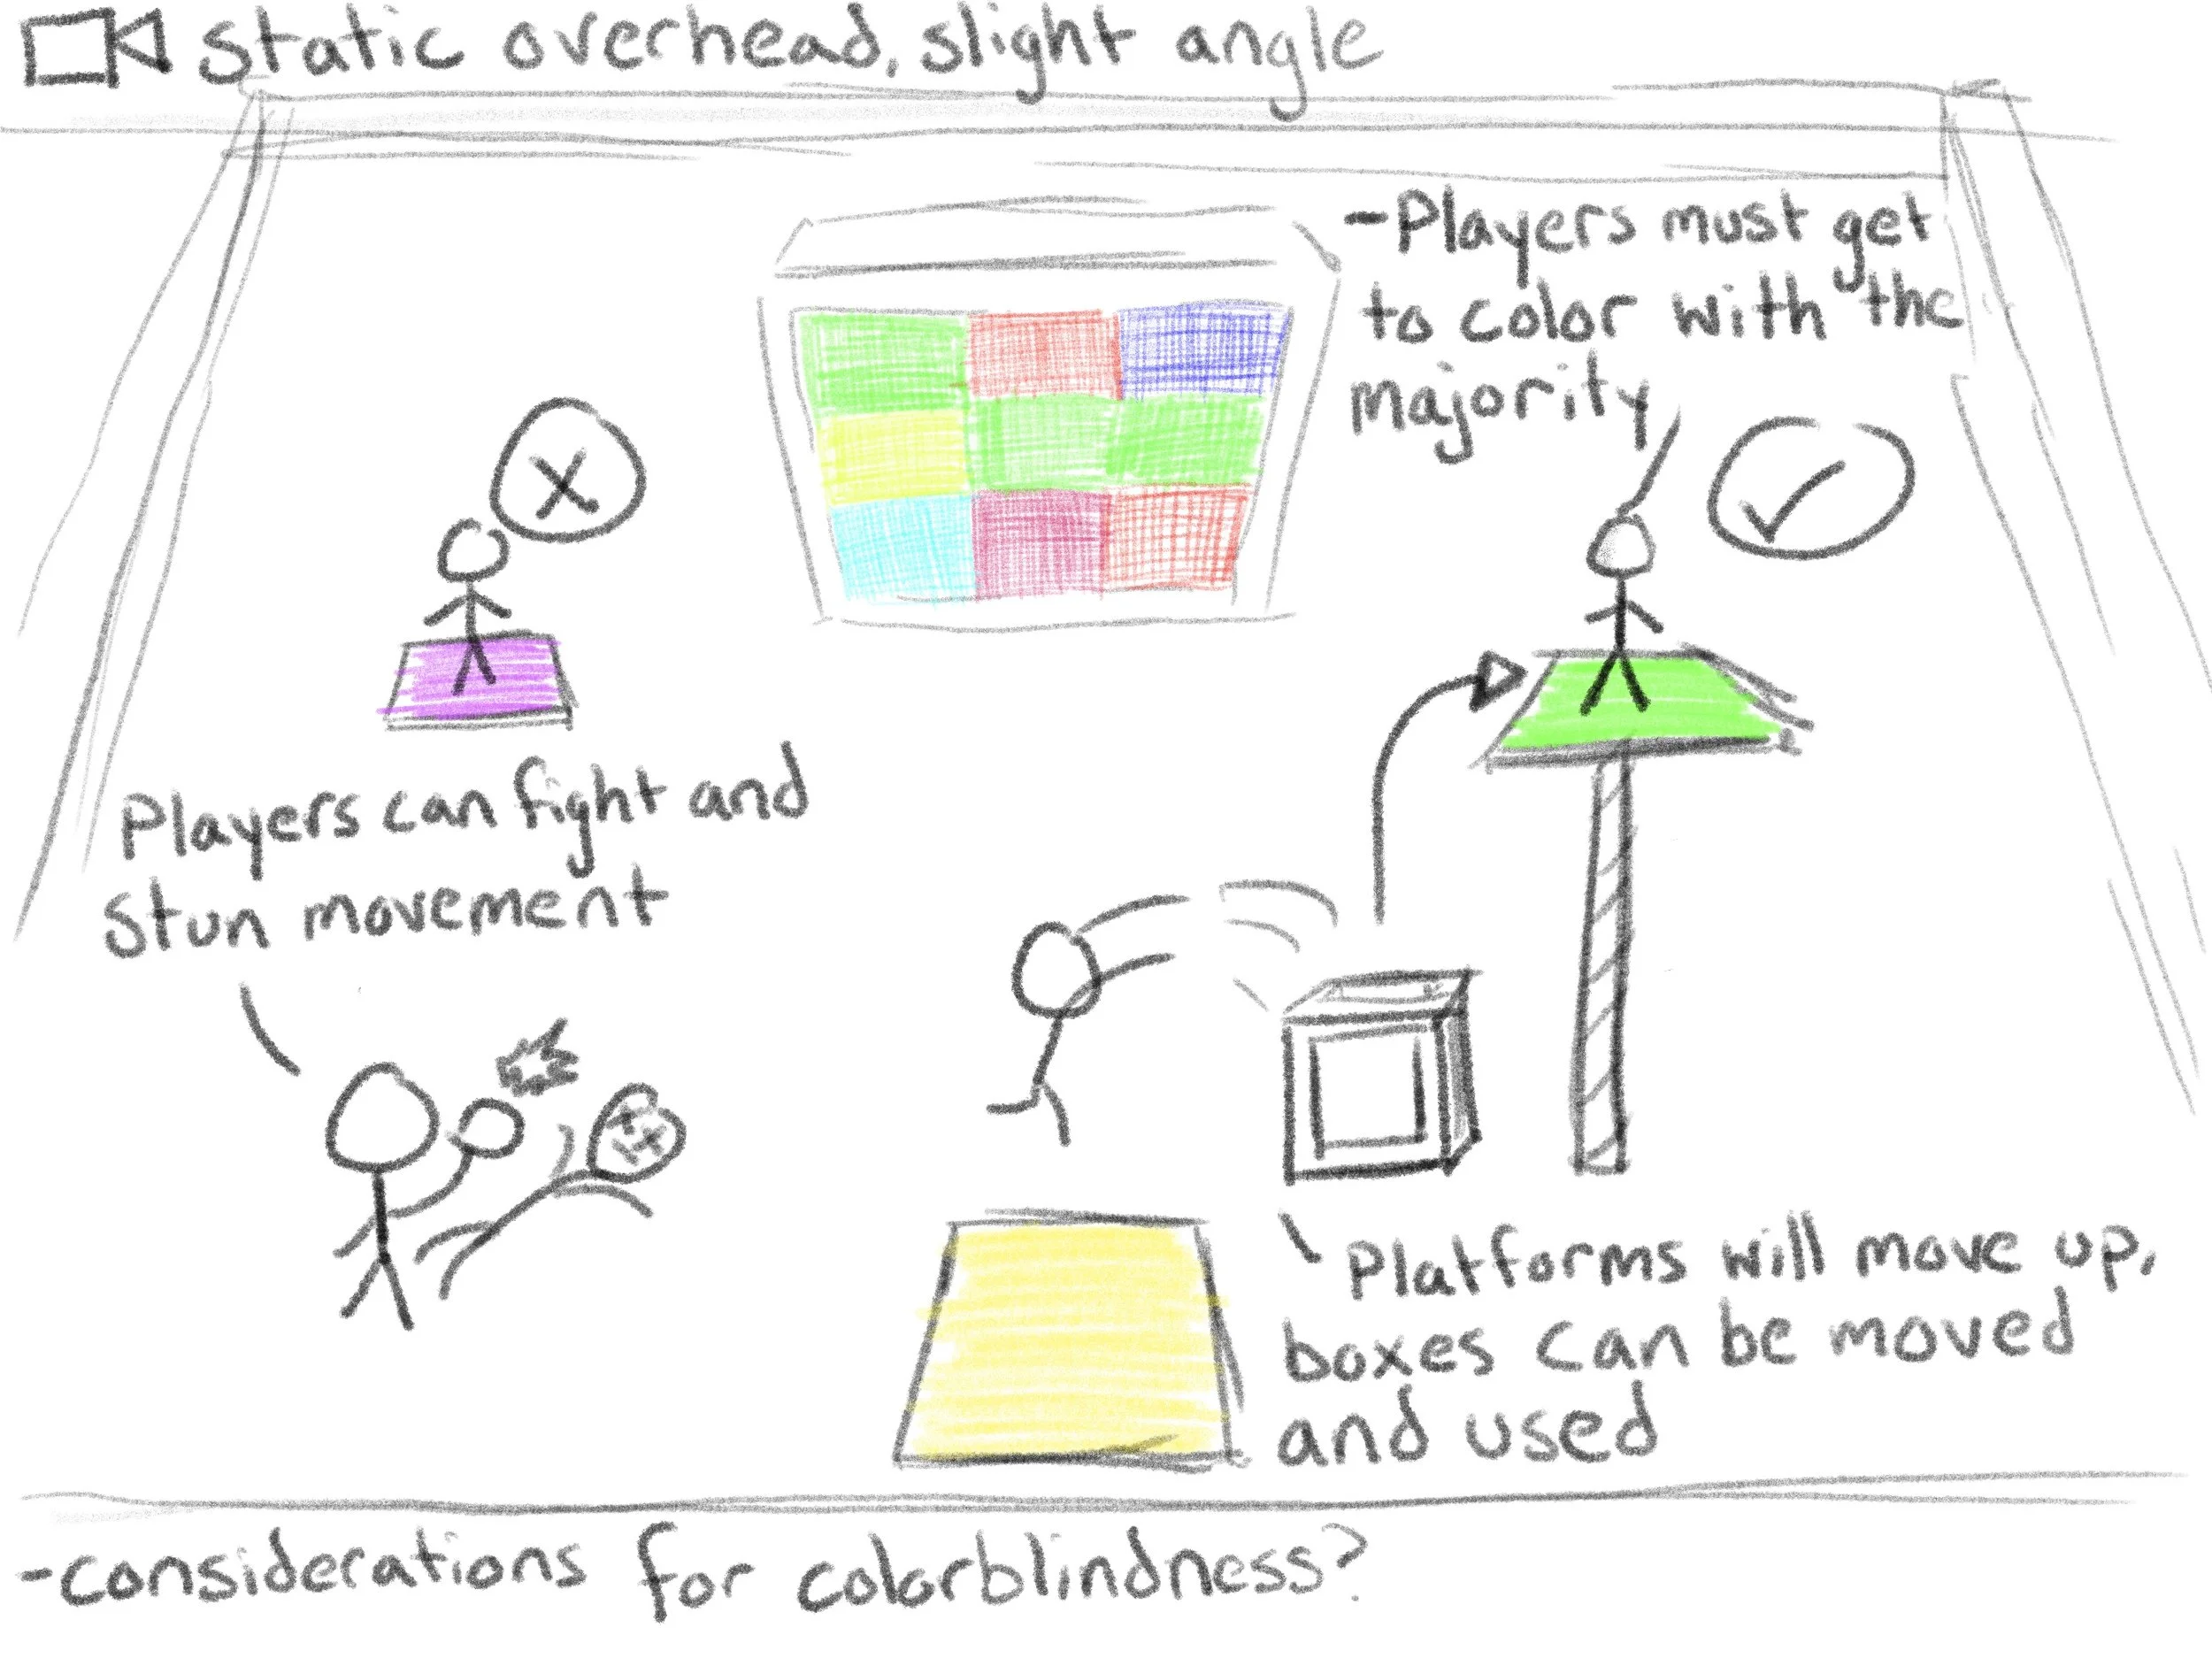
General layout with some gameplay examples. For now I’m keeping theme and artistic design ambiguous and mostly greyboxing because I would like to workshop a coherent visual language across all the minigames. The current goal is just getting the gameplay working. Core design is around the player balancing focus on reading the correct answer, performing the platforming challenge, and avoiding or participating in hindrances between players.
I try to identify the one sentence description of the game at the start. If your friend who has never played before asks what they need to do, what do you say? In this case, “the screen displays a color, get to the platform of the matching color.” Having a mission statement this simple is important to onboarding a new audience. In an infinitely complex game like League of Legends, the mission is simply “destroy the Nexus",” or, “destroy the other team’s base.” Although that says nothing about micro-mechanics or strategy, the new player has a goal in mind, and they will naturally develop ideas about how everything else works as they try and fail to win.
Let’s break it down even further. What is one round of gameplay?
The main screen rolls a random color for a set amount of time
The color is chosen, and one platform is assigned that color, the rest are assigned random options
Players have a set amount of time to move onto their chosen platform
The players are checked for correctness. If correct, they are safe. If wrong, they lose a life
Players are removed if they are out of lives
If more than one player is remaining, we go again
By thinking about the gameplay loop in simple linear steps, the functions that need to be created basically write themselves. Each of the above statements is a task that should be executed in the GameMode blueprint, looping until the player has lost their lives.
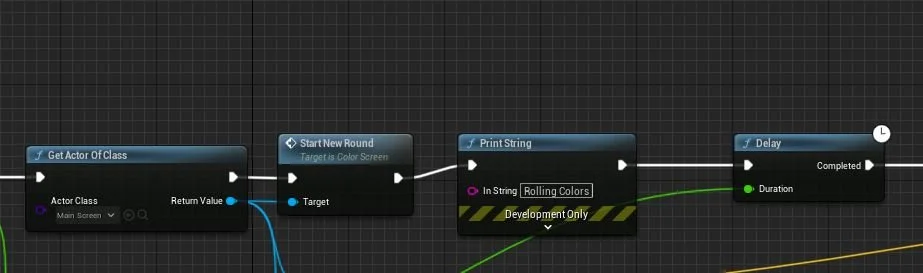
Here’s a snippet of the GameMode Blueprint. By using GetActorOfClass, you are able to begin event functions of other classes. StartNewRound is an event that takes care of the rolling effect of the color by manipulating the base color of the screen actor every .2 seconds (or whatever you’d like). The delay node is synced with the set time for the entire event to happen, so the moment a color is chosen, the platforms will be assigned their colors.
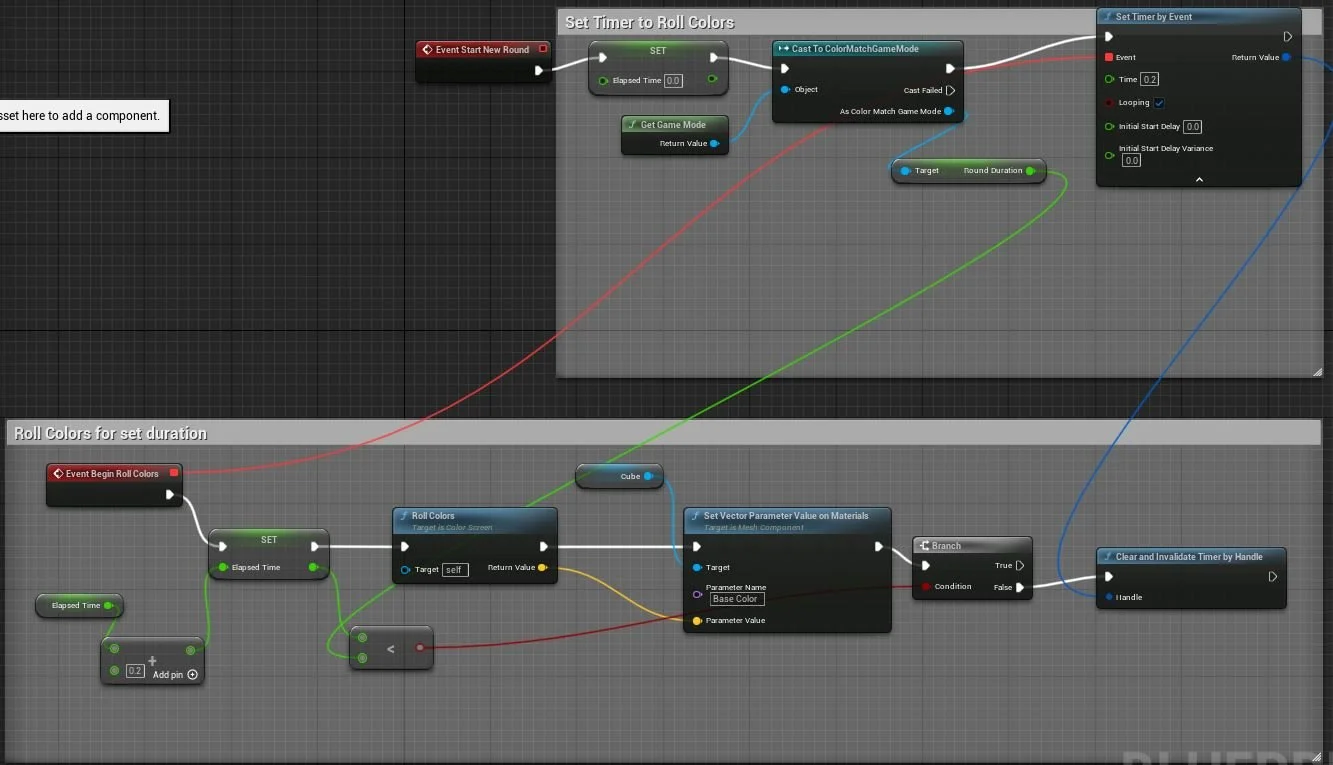
Here is the StartNewRound of the MainScreen Actor. The only custom function here is the RollColors at the bottom, which is just choosing a random FVectorArrray index that corresponds to an RGB color. The idea is that the player will see every option get “rolled” through, to add more visual appeal instead of just simply remaining static on the correct color.
The first major problem I ran into was figuring out how I’d like to handle the looping of certain events, like this one. For C++, you can use GetWorld()->GetTimerManager().SetTimer, along with a declared FTimerHandle to loop a function for a determined amount of in-game time. A snag I ran into is that the function chosen for the .SetTimer parameters cannot have parameters or return values of its own. In this case, because I need the chosen color to make a visual change, I needed that output exposed. On the blueprint side, SetTimerByEvent is great for simple loops. Using the set up shown in the picture, I am able to display a new random color every .2 seconds. Once the ElapsedTime is equal to the Duration set in the GameMode, the timer is killed and the screen becomes static on the last color. A particular quirk on this method is that the SetTimerEvent actually runs once before the Event BeginRollColors event is started. This resulted in a mismatch of color between screen and platforms by exactly 1 in the sequence. I took care of this by increasing the delay before platform assignment by .2, but you could just as easily attach the execution pin to the main functions on the bottom to give you an extra roll.
Another issue I ran into I’d like to highlight for posterity is dealing with the Random node for getting array values. Essentially I have an array of 4+ RGB vectors, which are copied over to another array that is used for platform assignment. The second array is guaranteed to contain the color on the screen, as well as 3 unique random wrong colors. These are assigned to the platforms, but then removed from the array so that no platforms have the same color.
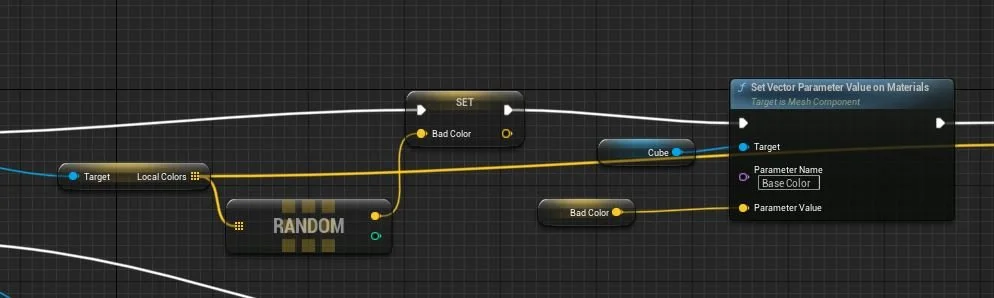
Here’s an example in a PlatformActor instance. If the random node’s output pin was connected to the Parameter value of the SetVectorParameterValueonMaterials, AND connected to a remove node, those two outputs would actually be two different random vectors from the LocalColors array. If you want to do multiple things with the same random query, you need to set it to a static variable that can be reused further in the execution line.
Post-Analysis and Next Steps
Here is one round of the initial build. The cube in the back determines the final color, while the platforms are assigned colors, one of them matching the cube. You can see that the black cube, the “character,” is given “incorrect” feedback in the top left because they stood on the blue color.
This is currently in a very bare bones form, but I’m happy that the base design has been established and is functioning well. My next main goals are to clean up and optimize some variable usage, expose some variables as player settings, and further dive into Unreal Engine programming terminology. I would also like to expand the complexity of the base game, like making the color roll start to mix colors together, requiring the player to choose the MAJORITY color to win the round. I also intend to have the platforms move in all directions as the color is rolled, to add the challenge of platforming. If there’s time before the next write-up, another main feature would be boxes on the ground that could be used to aid in the platforming.
Back to work!